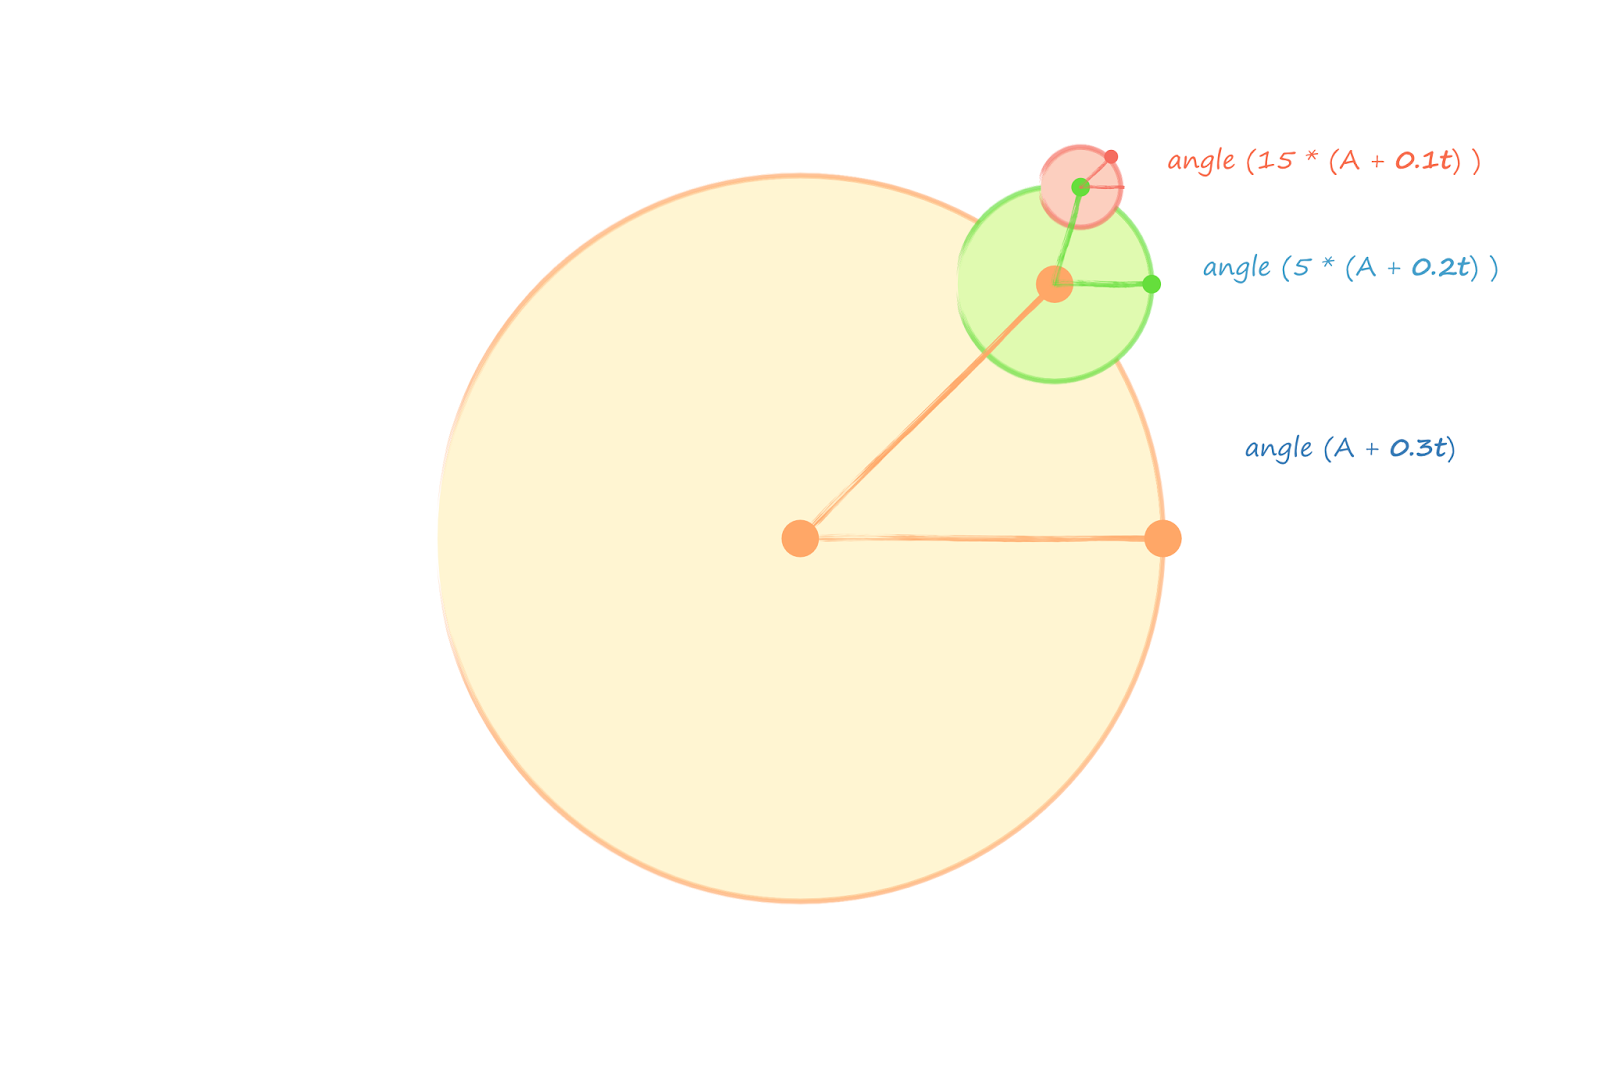
Friday 29 December 2017

Escape Condition for Julia and Mandelbrot Fractals

This post isn't a tutorial on creating the Julia or Mandelbrot fractals - you can learn about that here. Here we'll focussed on a specific bit of mathematics about the "escape condition" that many guides state but fail to explain.


Basic Idea

The basic idea behind both Julia and Mandelbrot fractals is to take a starting complex number $z_0$, apply a simple function $z^2 + c$, and feed the output $z_1$ back into this function as input. Doing this repeatedly we get a sequence of output complex numbers, $z_1$, $z_2$, $z_3$ ...

$$ z_{n+1} = z_{n}^2 + c$$

These output values can behave in one of three ways:
  • They can get larger and larger, towards infinity. This is called escaping.
  • They can get smaller and smaller, towards zero.
  • They can orbit around, but without getting ever larger. In some cases they can approach a finite constant.

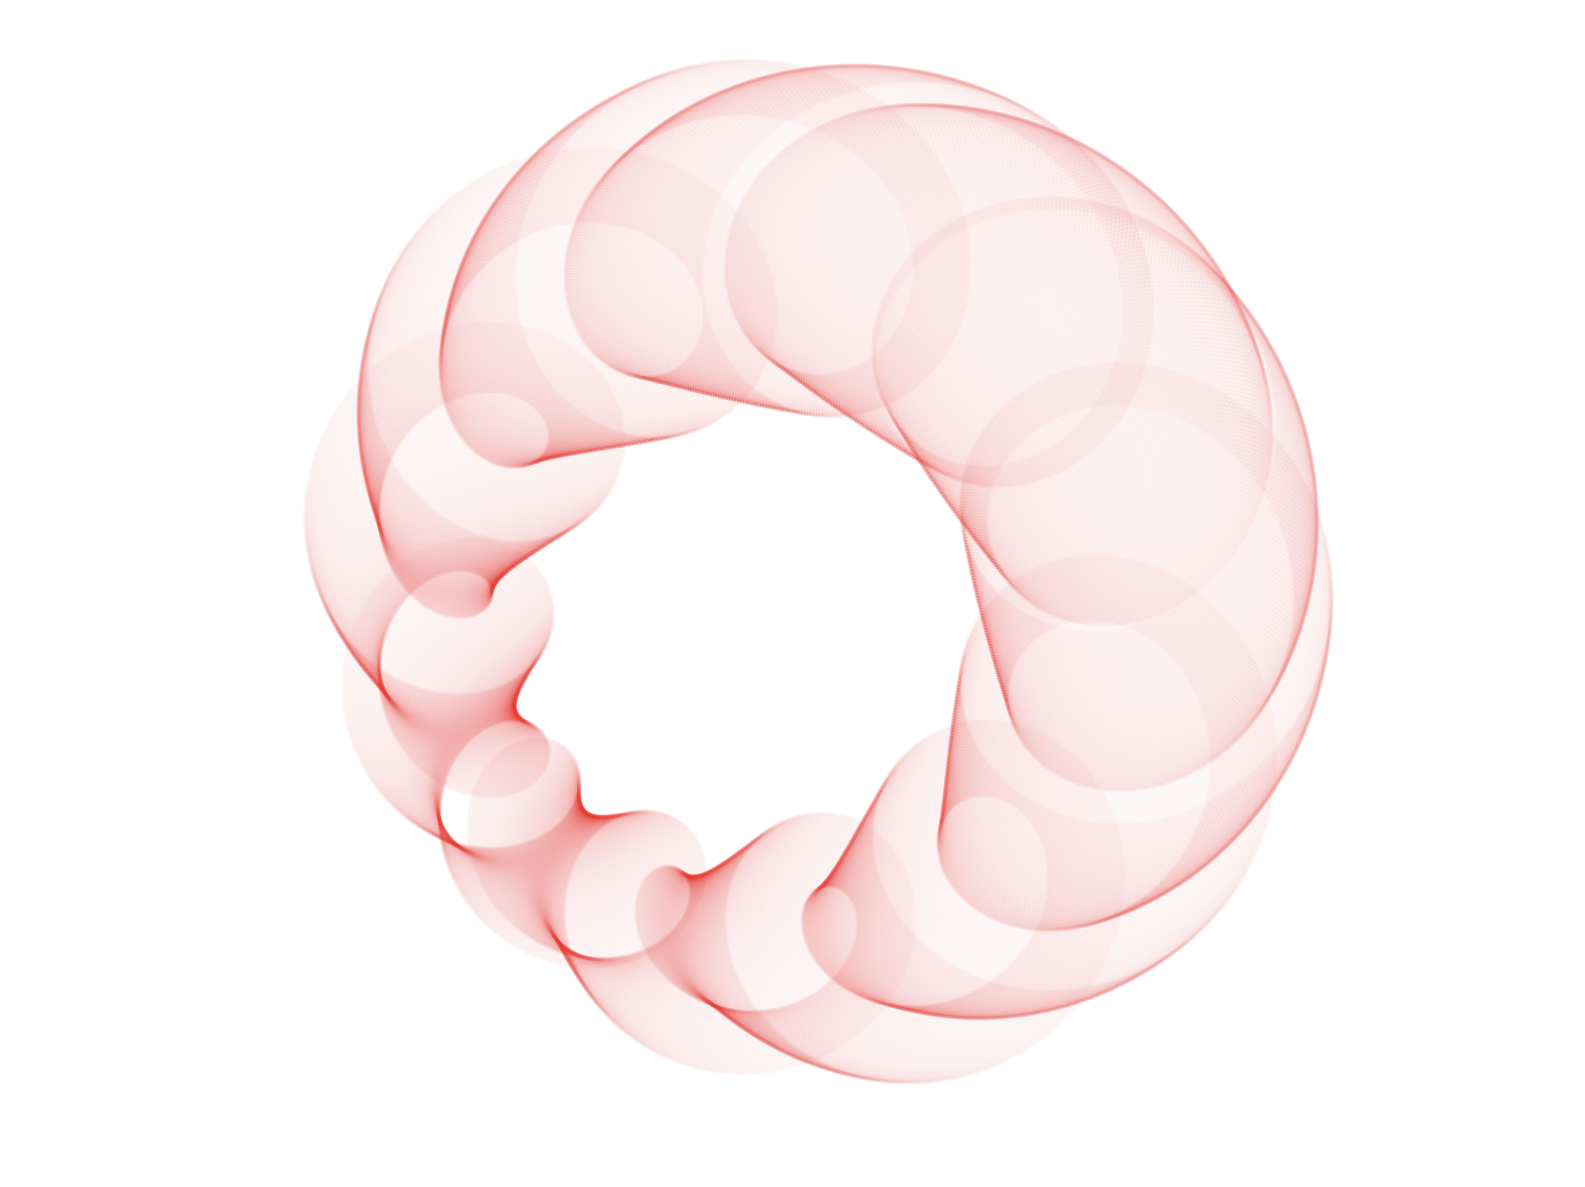
The fractal patterns are coloured to show which points escape, and which don't. Those that escape are outside the fractal, and those that don't are inside.


The difference between Julia and Mandelbrot fractals is only how we choose $z_0$ and $c$.


Computational Problem

The behaviour of complex numbers under $z^2 + c$ is chaotic. That is:
  • The output sequence is very often irregular, and predicting future values is very difficult without actually working out the sequence. They seem random, even if they're not.
  • The sequence is very sensitive to starting conditions. That is, even a tiny change in the starting conditions can drastically change how the sequence behaves.

We can't derive a mathematical formula which tells us which points are inside the fractal, and which are outside (they escape). And this chaotic behaviour suggests we can't truly know even if we run the feedback iterations many many times, because the sequence can suddenly escape after a long period of orbiting around.


Practical Compromise

So we have to compromise - we agree to generate a fixed number of output values, so we can render an approximate pattern. Perhaps a sequence of 50 output values is sufficient? Maybe 100? Maybe even 1000?

By experimenting, it becomes clear that 50 or 100 iterations is fine, except when we are zooming into a very small area of the fractals, where we need more iterations to be able to separate out the inside and outside regions. If we don't do this, the details of the fractal don't emerge.


Computational Shortcut

For many starting points in a fractal pattern, the output values will get larger and larger very quickly. We want to stop calculating the sequence for two reasons:
  • If the numbers get too large, this can cause our code to crash with an error, or worse, continue with incorrect calculations. The root cause of this is that the largest size of number we can store and calculate with is fixed.
  • We don't want to waste time and computational effort continuing to calculate the sequence which is only every going to get larger and larger. This shortcut can be important because the calculations for detailed fractals can take a long time.

So many guides will state that we can stop calculating the sequence when the magnitude $|z_n|$ gets larger than 2.


That works well, and makes intuitive sense. If $z_n$ has got so large that it is more than 2 away from the origin, then it will forever get larger and larger. But the statement is rarely explained.

Next is a simple proof - and also a demonstration that the popular escape condition $|z_n| > 2$ is incomplete.


Simple Proof

First let's remind ourselves of the triangle inequality, which basically says that a direct path is always shorter than an indirect path between two points.

$$ | a + b | \leq |a| + |b| $$

Let's contrive to artificially expand out $|z^2|$,

$$ |z^2| = |z^2 +c -c| $$

If we use that triangle inequality, with $a = z^2 +c$ and $b = -c$, we have

$$ |z^2 +c -c| \leq |z^2 +c| + |-c|  $$

but because $|-c|$ is just $|c|$ we have

$$ |z^2 +c -c| \leq |z^2 +c| + |c|  $$

Now, remember the next value in a sequence is $z^2 + c$ because that's the function we keep applying. Let's bring that to the left of that last inequality.

$$ |z^2 +c| \geq |z^2| - |c| $$

Also, $|z^2|$ is the same as $|z|^2$ so we have

$$ |z^2 +c| \geq |z|^2 - |c| $$

Now is the interesting part. If we say that $|z|$ is bigger than $|c|$, that would mean

$$ |z|^2 - |c| \gt |z|^2 - |z| $$

That means we can also say,

$$ |z^2 +c| \gt |z|^2 - |z| $$

Which can be factorised as

$$ |z^2 +c| \gt |z|(|z| -1) $$

Let's rewrite that previous expression as a ratio of the sizes of the current $z_n$ and the next $z_{n+1} = z_n^2 + c$,

$$ \frac {|z_{n+1}|} {|z_n|} \gt (|z| -1)$$

Now another interesting part. If we say $|z|$ is greater than 2, that means $|z| -1 \gt 1$. So we finally have

$$ \frac {|z_{n+1}|} {|z_n|} \gt 1$$

Which is saying that $|z_{n+1}|$ is always greater than $|z_n|$ as long as:

  • $|z| \gt |c|$, and 
  • $|z| \gt 2$

So we've shown that two conditions need to be true to prove that the sequences escapes, not just the traditional one. However in practice, the traditional $|z| \gt 2$ seems to work well enough because $c$ is almost always chosen to be small.


Reference
One text that does try to cover this is Chaos and Fractals: New Frontiers of Science.

Friday 17 November 2017

Spirograph!

My young daughter and I were doodling and we came up with the following sketch.


The idea was simple. We place evenly spaced markers around the edge of a circle, and then draw lines between them. If you follow the blue lines, you can see they start at a marker, miss a marker, and end at the next marker. The yellow lines skip two markers.

Could we create some algorithmic art based on these ideas?


Going Around a Circle

We need a mathematical way to move around a circle in evenly spaced steps. How can we do this? The easiest way is to start with how we naturally think about following the outline of a circle - we naturally think about turning in even steps. That means we increase our angle of turn in even steps. We're familiar with angles to measure the amount of turn from our time at school.  The following shows some examples of counting angles in degrees.


Computers, and programming languages like Processing and p5js, internally work in terms of horizontal and vertical (x, y) coordinates. That means we need to translate our moving around a circle by counting the angle, into (x, y) coordinates. Luckily there is some maths that helps us.


The maths allows us to translate from the world of angles into the world of (x,y) coordinates. You can see from the diagram above that point P is at an angle A, around a circle which has radius R. what we want is to be able to say how far across, x, and how far up, y, that point is. The maths tell us how to do that:
  • x = R cos(A)
  • y = R sin(A)

The cos() and sin() are mathematical trigonometry functions, which you can find on most calculators, and in many programming languages, including Processing.

If we count up the angles A from 0 to 90 degrees in steps of 10, and use that trigonometry to calculate x and y coordinates, and mark those points with little red dots, we get the following.


That shows the maths works. If we carried on counting beyond 90 to 360 degrees, we'd get a full circle of dots.


Skip Step Patterns

The following shows the idea of drawing lines between these markers, but missing a few markers, like our original doodle.


You can see how we can count up the angle in steps, just like we've done, and that point can be the start of the line. You can also see that the end of the line is at a point that's just a few angle steps ahead. The diagram shows the point 6 steps ahead. If we were counting the angle up in steps of 10 degrees, the end point would be at (angle + 60) degrees.

If we repeat this process of drawing lines, we can create nice patterns like the following, which shows 2 overlaid patterns created from different skip steps.


We can have a lot of fun varying the number of skip steps to create different patterns. But let's do something even more ambitious.


Gears

Have a look at the following diagram. It shows a new imaginary circle centred at point P. That smaller circle, shown green, has a point Q that goes around its edge, just like point P went around the big circle's edge.


You can also see that we've set the point Q to go around faster than point Q. Whenever point P is at an angle A, point Q is further along at point 2A. That's just a choice we've made for now. There is some basis for this - this systems works like gears, where the smaller cog turns faster than the larger cog.

What would happen if we plotted points Q as they went around that circle? We can calculate the (x,y) coordinates of Q by realising we can calculate how far Q is from P just like we did before.


We can use the same trigonometric equations to tell us how far along x2 and up y2 the point Q is from P. You can see from the diagram the coordinates of Q are then (x1 + x2, y1 + y2). We've renamed the location of P to be (x1, y1).

Here's the result.


That's interesting, but not really that exciting. What happens if we make Q go faster at 5A not 2A?


That's much more interesting. In fact we have spend hours tweaking the angular speed of Q to get different patterns.

Let's not be satisfied with that though. Look at the following diagram.


Now we have yet another, even smaller red circle attached to the medium sized green one. That one has a point S that turns around the centre which is point Q. And we know point Q turns around point P. Here's we've chosen to have point S turn even faster at an angular speed of 15A, that is fifteen times faster than point P goes around the big circle.

We can do the same maths to work out the position of point S. Here's the result of setting Q to speed 5A and S to speed 20A.


That's an interesting pattern. It loops in on itself, which we expect as the smaller circles create tighter loops, along a broader trajectory set by the bigger circles. The dots make it harder to see the fine detail, so let's increment the angle A in smaller units of 0.1 degrees - that's a tiny turn! We can also set the red dots to be translucent - which helps to see more detail when things get overcrowded. Here it is again.


Much better. We can see the denser areas where the points are closer together because the point S is moving more slowly.

Now, let's do one more enhancement. Let's take the angle for each of the points on the large, medium and small circles, and add some variation to them. So if we take an angle A for point P, we can create several new versions of this by adding a small amount to it. If we added 1 degree to it, nine times, we'd get nine new angles, A+1, A+2, A+2 ... A+9. Let's call this new additive parameter t, which we can add to each of the angles for points P, Q and S. The following diagrams shows the idea.


You can see that several versions of P are calculated at angle (A + 0.3t) where t varies, say from 0 to 100. Similarly, point P has versions with angles 5(A + 0.2t), and point S has 15(A + 0.1t). You can see that we've multiplied the t by quite small fractions - that's just arrived at through experimenting with what works and what doesn't.

Plotting the points that correspond to the point S, for every variation that comes from these little additions should give some interesting results.

This one is based on the same pattern above with angular speeds: P at A, P at 5A and Q at 15A, and the angles for P varied by 0.1t, Q by 0.2t and S by 0.3t.


It's really nice! The source code is at https://www.openprocessing.org/sketch/474017. Feel free to copy and change it.

Experimenting with both the angular speeds, and also the angle variations give us a wide variety of interesting, natural forms. This one looks very ribbon like.


A simpler one.


This one looks very cloudy.


I really like this one, which is also online at https://www.openprocessing.org/sketch/476269. It evokes some kind of alien sea creature!


This blog is adapted from a section of my upcoming gentle introduction to algorithmic art - Make Your Own Algorithmic Art, which starts from no assumed expertise in coding or maths, and goes gently from there.

Join in with the Algorithmic Art meetup group, which meets monthly in London.

How Computers Make Colour

How do computers make the colours you see on your laptop screen or your smartphone display?


Mixing Colours

Let’s go back to our earliest experiences of colour, when we were very young and had pots of paint to play with. What happened when we mixed yellow and blue paint?


When we mixed yellow and blue paint, we got a kind of green. Many artists are familiar with mixing paint colours, though it is a skill that takes time to develop. You may already be familiar with primary colours which are mixed to make other colours.

When computers create colours, they also mix primary colours. But there is an important difference we need to be aware of.

When we mix paint, the resulting colours get darker and darker. Mixing in more and different paints, gives us darker and darker colours, until we almost have black. In real life, we often end up with a muddy dark brown.

When we mix coloured light, the resulting colours get lighter and lighter. If we mix more and different coloured lights, the results will be lighter and lighter colours, until we get to white. Here’s a picture showing coloured red and green torches, not paint, being mixed.


You can see that when the lights overlap, we have yellow, a lighter colour than red or green.

So we’ve just seen two different ways in which colours combine
  • Mixing paint results in darker and darker colours. 
  • Mixing light results in lighter and lighter colours.


Additive and Subtractive Colour

You don’t have to know why this is but it is interesting. White light is made of of a mixture of purer colours. You will have seen them separated out with a prism, or a rainbow in the sky, where raindrops act like prisms. Paint, pigments and dyes work by absorbing some of these parts of white light, leaving the remainder to be reflected back. Adding more, and different, paints means more of the elements of white light are absorbed, leaving less and less to be reflected. That’s why the results get darker. This is why mixing paints is called subtractive colour mixing.

The subtractive primary colours are cyan, magenta and yellow. You may have noticed your colour printer mixes colours from inks of these primary colours.


Mixing coloured light is just that, adding together different parts of white light. Mixing different colours means adding more and more of the elements of white light. If we had all the elements of white light, we’d end up with white light! This is like the opposite of a prism or a rainbow. Instead of separating out the rainbow colours, we’d adding them in. That’s why mixing light is called additive colour mixing.

The additive primary colours are red, green and blue.


What is important for us, is to know that computer screens, like a laptop display, a smartphone or tablet screen, make colours by mixing red, green and blue light.

Computer displays are made of tiny little coloured squares called pixels. Those pixels are actually made of 3 smaller bits, which are teeny weeny red, green and blue lights. By turning on each of these three colours by different amounts, the pixel takes on different colours. So to make yellow, a pixel will have the teeny weeny red and green lights turned on, but not the blue light.

With Processing, we can mix these primary colours to make our own colours too. We can have very fine control over the exact colour we want.

So let’s look at some examples of mixing red, green and blue light to get a feel for how it works.


Let’s start at the top left. The first example shows only red light switched on. There is no green or blue light in the mix. You won’t be surprised that makes a red pixel! The next example along, is the same but this time the red light has been turned down to about half strength. This makes the resulting colour darker, not lighter, because there is less light overall. If we turned down the red to zero, we’d have no light contributing to the mix at all, and we’d end up with black.

The next row shows all three red, green and blue turned on about half. The important point here is that they are all turned on at an equal level. This gives us a mid grey. The next example is the same but this time the amount that all three red, green and blue are turned on is a bit higher, about three quarters of the way up. The result is a lighter grey. That’s because there is more light contributing to the mix. If we turned the levels up to the max, we’d get white.

The last row is more interesting. Here we show how light mixing creates different colours. Mixing red and green light makes yellow. How do we make it darker? Well, we’ve just seen how reducing the amount of light being mixed makes the result darker. So having levels of 50% red and green would create a darker yellow. That’s not a surprise, the first two rows show this happening. So here’s a more interesting question: how do we make the yellow lighter? Hmm. Well, we know we need to add more light somehow. We can’t add more red or green as those are already at the maximum level. The only option left to us is to add more blue light. It works! Think of like this. Red and green but no blue makes yellow. But an equal amount of all three makes a neutral grey. So we’ve just taken a light grey and added some yellow to it, to make a light yellow.

Don’t worry about being able to predict what colours will result from mixing red, green and blue light. You develop a feel for it over time, and even professionals don’t need to be able to do it without help. You can find many tools on the web, or in your favourite photo editing software.

Here’s a good tool for mixing red, green and blue, or just RGB, to make colours https://www.w3schools.com/colors/colors_rgb.asp. Here is the tool being used to make the darker yellow.


Have a play yourself, moving the sliders to add more or less red, green and blue elements. It’s quite fun mixing light to create colours. I really encourage you to do this, as this is the only way to start to get a feel for what combinations make which colours, and how light or dark they are.


0-255: Computer History

Did you notice that the tool shows the sliders going from a low of 0 all the up to a maximum of 255? Why isn’t this 0 to 100%, or maybe 0 to 1? Those would make sense. What sense does a top level of 255 make?

That 255 is an antique from history. When I was little, in the 1980s, computers were much less powerful than they are today. The numbers they could easily store in their memory maxed out at 255. To have bigger numbers, they had to do complicated things joining bits of memory together. You may know that computers store only 1s and 0s, and eight of these can represent numbers from 0 to 255. Eight bits was the size of a normal memory store. That’s where the phrase 8-bit comes from. The red, green and blue colour levels were stored in memory that could only go from 0 to 255.

So RGB values going from 0 to 255 have stayed with us. Today, you’ll see this in your favourite photo editing software, tools like Photoshop, Krita, Gimp and many more. The following shows a tool I use. You can see the sliders and RGB values going up to 255. You can also see I’ve made a light yellow and used the paintbrush to make a light yellow mark.


This blog post is based on content for a book I'm working on: Make Your Own Algorithmic Art

Wednesday 25 October 2017

Ideas for Making Processing Even Easier for First Time Coders

Update - looks like these suggestions have some sympathy at p5js, see the github issues discussion.


I've made good progress on my guide to algorithmic art, which aims at being accessible to artists who have never coded before, and who might even by shy of technology.


Simplest, Most Minimal Code

I try introduce coding (with p5js) in a very gentle and friendly talkative way.

Concepts like the canvas are familiar easy to get - they have a size and background colour, and you make marks on them, just like real life canvasses for painting on.

I then try to only introduce the simplest and most minimal code needed to get started making interesting compositions. I try to postpone looking at more complex code for as long as possible.

For example, to start with I avoid notions like RGB colour mixing, and just stick to the named CCS colours, like "red" and "pink".


This way, any technical or mathematical barriers are minimised and postponed,  helping to build up confidence and establish some good coding experience sooner.

But trying to do this I've run into things that make Processing/p5js harder than it needs to be. Here are three that I've found so afar.


Problem 1: Not So Simple Shapes

What's the simplest shape to use for learning Processing and exploring mathematical ideas?

A circle is a really simple - and friendly - shape. It only needs the location of its centre, and its size, to be specified. A line is more complicated because it needs the start and end location coordinates to be specified.


But Processing doesn't have a circle() instruction!

Instead it has an ellipse() command. The word ellipse is not as friendly a circle, and can seem scarily mathematical, likely losing some beginners a this early and unnecessary hurdle.

What's more, we have to explain that an ellipse with the horizontal and vertical diameters set to the same numbers ... is in fact a circle. Again, this is really too much to be expecting a reticent shy non-technical artist to be struggling with.

Processing would be so much more beginner friendly if it had a circle() instruction:

circle(10, 10, 5);

Instead of

ellipse(10, 10, 5, 5);

or even the 3-parameter version where the vertical and horizontal diameters are assumed to be the same:

ellipse(10, 10, 5);


This should be a really easy change to the p5js source code as circle() could simple call the existing ellipse(), an alias if you will.

What's the next simplest, most familiar shape? A square! But Processing doesn't have a square() instruction either.

Instead, Processing requires us to use the rect() instruction. It's not even immediately cleat that rect is for rectangle. If we're trying to keep technical and mathematical distractions away from new beginners, we shouldn't be asking them to remember that a rectangle with equal sides is a square, and that for some reason we use a truncated English word, rect, not rectangle.

Again, this should be really easy to implement in p5js's source code.


Problem 2: Loopy Loops

Repetition is an important concept in both art and in computer science. Repeating chunks of code is a very powerful thing to do.

How do we repeat some code 5 times in p5js?

for (var count = 0; count < 6, count = count + 1) {
  // do something;
}

Yikes! Try explaining that to a complete beginner! I do try, and even then, the following are conceptually painful and counter-intuitive.
  • the use of 6 when we want the code to be repeated 5 times, not 6
  • the use of a condition to continue, rather than an ending condition

A construct with a different idea such as "repeat .. until (condition)" would be far better and more intuitive. We all understand the plain English explanation "keep doing this until that happens". Instead we have "start here, keep going as long as this is true, and at every loop do this" .. bleurgh!

But we can do even better, simpler. Logo, an education focussed language designed in 1967, got it right with a simple REPEAT 5. That's it. That's a lesson in simplicity. From 1967.

It would be great to have that simple easy entry into loops with p5js, something like:

repeat 5 {
  // do something; 
}

It is true that a counter is very useful as we get more advanced. But then Python can show how that can be done really nicely too - for x in range(10), or for y in [2, 3, 5, 7]., where we can use the counters x and y inside the repeated code.

It should be easy to do easy common things - that's a great design philosophy.


Problem 3: Picking Random Numbers

Another important and very useful algorithmic concept is randomness. Using randomly chosen numbers to decide things like location, size, colour is interesting as a tool for composing images.


Look back at that last sentence - location, size, colour - these are all defined by whole numbers. Location is in terms of (whole) pixels, Size is in (whole) pixels in Processing. Colour is actually based on mixing red, green and blue light and the underlying system is based on a scale from 0-255 going up in whole numbers.

Yet we use random() to pick random numbers .. and they're floating point decimal numbers like 1.31, 3.28, 21.01 and so on. Not integers. So p5js has to round these to integers when used for location, size and colour

Because this rounding to whole numbers happens behind the scenes, I did try to ignore and avoid the issue altogether. Nobody would know that circle(random(100), random(100), random(20)) involved floating point numbers.

But we can't ignore it if we use randomness to throw dice, to decide whether we do something or not. Something like "throw a coin, if it's heads do this" .. or "throw a six sided die, and if it's six do this". That requires integers.

There isn't a function for randomly picking whole numbers. So we end up with:

if (int(random(6)) == 0) {
 // then do something;
}

That's uneccesary complexity and code.

Most languages and maths libraries have a random integer generator as a first class functon, a randint() would be good.

But even randint isn't the friendliest word. I propose that we keep the simplest case simple, and only incrementally adding complexity:

random(5) // pick a whole number from 0, 1, 2, 3, 4, 5
random(1, 5) // pick a whole number from 1, 2, 3, 4, 5

randomf(5) // floating point number in range 0 to 5, exclusive
randomf(1,5) // floating point number in range 1 to 5, exclusive

That would break backwards compatibility, so might be something for the next major version of p5js.

Thursday 31 August 2017

We Need To Talk About Code

I've started writing the guide and immediately run into the problem of introducing code.

The overarching aim is to write a guide about algorithmic art, focussing on the key ideas like repetition, randomness, recursion, chaos and so on, .. in a way that is gentle enough for artists who have never coded before, and might be a little shy of technology.

So how do you introduce the idea without scaring readers away? We do need to code pretty soon into the book.


There seem to be a few options to think deeply about:

  • Include a beginner's tutorial on programming an easy language like Python or p5js.
  • Use lots of analogies like food recipes and DIY instruction booklets as a precursor to actual code.
  • Just do it - without lots of introduction or preparatory talk, just start using it, with very very simple examples first.


I've struggled with which approach to use, and currently the draft texts has a mish-mash of all three.

To answer this, let's start again from first principles:

  • Programming languages like Python or p5js are supposed to be easy to learn and use. So they shouldn't huge theoretical preparation. 
  • We're supposedly starting small and growing from there. That means we should be able to introduce simple small bits of code first, demonstrate it working, and demonstrate how easy it was, and grow confidence from there. There's no need to know all or lots of code before you have a go. In fact, these days, nobody knows all of a language, you look it up.
  • Practical learning is always better than theoretical learning. Well, that might not apply in all cases, but is a major foundation of successful learning courses.


That seems to have answered the question.

  • We'll start asap, with small bits of code and grow from there, learning by doing, not learning huge amounts in a theoretical way first.
  • I don't think p5js is so easy that it needs to explanation, but starting with small easy snippets, we can build a foundation for learning more on.
  • An introduction should only go as far as comparing natural human languages, like English, and their ambiguity and inconsistency with precise, unambiguous, consistent programming languages.


Wednesday 21 June 2017

OpenProcessing.org - Coding Without Distractions

I've been thinking quite hard about how to make the first few steps for complete newcomers as easy and as productive as possible.


The Wrong Way

What I don't want is a high barrier at the start - like learning about HTML or Javascript or code editors, or saving files.

What I also don't want is for positive feedback to be delayed until quite late in the book - we don't want to have to go through lots of theory or concepts before we actually code and see something happen.

I was going to settle on downloading p5js, firing up a browser, pointing it at the source html file, using a text/code editor to edit the javascript file, and refreshing the browser to see the results .. all of these steps are not necessariy easy for non-technical artist. Add javascript web console debugging .. and you've lost the audience.


OpenProcessing To The Rescue

Luckily, over recent years, very friendly web sites have emehed, like trinket, codepen and jsfiddle. These allow you to write code directly into the browser and see what it does, without the need for downloading any files, firing up text/code editors, saving files and refrshing your browsers. They're like mini IDEs on the web - and they're fantsatic for testing ideas, sharing code, and really really good for teaching newcomers.

You can use some ofthe popular ones with p5js but they're not quite designed only for p5js.

openprocessing.org

Luckily, openprocessing.org exists - it's just the other other online coding things, but is designed just for p5js. That means things like easy switching between the code and canvas, correct syntax highligthing and even a good attempt at debugging and error messages. And best of all - you can save and shae your sketches.

That's what we'll be using for our book then! .. and move the stuff about hosting your work on the web, workign directly with html and javascript files, to an Appendix.

Here's a taster for what the coding page looks like:

Editing Code

And here's what the resultant sketch looks like:

The Resultant Sketch

.. all this with nothing more than a browser. Perfect for beginners!

Monday 5 June 2017

Processing vs P5.JS vs Processing.py - Which To Choose?

Processing is the programming language designed specifically to make it easy for artists to create algorithmic art.

Yes, I know .. it has a terrible name, that confuses anyone who says "processing" ... but apart from that it is very good. It's used in the leading art colleges and universities, and

Here is a nice introduction to Processing by the inspirational Daniel Shiffman @shiffman.


Processing vs p5js vs Processing.py vs ..

Originally Processing was one language which came with it's own editor and runtime (the thing that ran your code and showed the images or animation).

That thing was based on Java, which was stable, and available on many platforms - Windows, Mac, Linux, and others too.

In recent times, the community has started to create different versions of Processing. The leading alternatives are p5js and processing.py. P5js is Processing implemented in Javascript, and works through web browsers. Processing.py still runs on Java but tries to have a more Python-like syntax, with the aid of Jypthon.

Which to choose for our Make Your Own Algorithmic Art?


Let's look at the pros and cons.

Processing

Advantages:
  • The original and primary implementation of Processing.
  • Lots of existing guides, tutorials, books for Processing.

Disadvantages:
  • Needs specific software to be installed to create art. 
  • Anyone who wants to see the creations also need to install the client - which is unreasonable.


p5.js

Advantages:
  • Creation of art does not need special software. 
  • Consumption of art does not need special software - only a modern web browser, which means works can be viewed on computers, laptops, tablets, smartphones... even tony things like Raspberry Pis, popular in schools and kids code clubs.
  • Works can be hosted easily on the web.
  • Based on javascript which has huge adoption and huge effort to continuously improve it's performance. 
  • Is an official project of the Processing Foundation - and therefore receives full backing (and quality control).

Disadvantages:
  • Debugging the code is not as intuitive or effective as the main Processing - you're effectively using the browser's javascript console to see errors for a clue to the bug.


Processing.py

Advantages:
  • Python is the best language for new comers to learn. It is easy to learn, easy to read, very applicable, has huge adoption and community. Many kids in primary schools are learning it to support the UK's new curriculum. Huge enterprises like Google use Python. It's also the de facto standard for data science, with a rich set of libraries.
  • The Python version of Processing has much simpler and easier syntax - no horrible curly braces or semi-colons to deal with. 

Disadvantages:
  • Relatively new, with fewer resources and guides, and some are actually out of date and don't work.
  • Some issues and bugs still present.
  • Based on the same Java application as main Processing, and so needs it for both creation and consumption.
  • Lots of useful Python libraries don't work as the implementation is actually Jython.


The Right Choice: p5.js

The choice wasn't easy.

I would have loved the simplicity and beauty of Python. Given the intended audience of readers who may be first-time coders, or those who are just not very confident - Python is by far the best language to learn. Far better than the less friendly javascript-like syntax of p5.js.

The next most important concern was accessibility. P5.js is based on web technologies which are standard in almost every computer from a laptop to a smartphone. No need for special software to create algorithmic art. And even more importantly, no need for special software to view and interact with the created art. Working over the world's most pervasive, open and democratic technology platforms - the web - is a huge plus for p5.js ... even if the syntax isn't ideal, and the debugging is not that friendly.

So the winner is ...


Sunday 4 June 2017

Welcome!

Hi and welcome!

This is a blog that will document progress on a new book Make Your Own Digital Art.

It'll be a book designed to be accessible, gentle, and fun .. aiming to
  • encourage artists to code and create algorithmic digital art
  • encourage technologists to express their own art.

The author (me) also organises the Algorithmic Art meetup, and the associated blog that writes up the session.

Draft Cover of Make Your Own Algorithmic Art